Video Modeling for Autism: A Practical Parent’s Guide
Video modeling is an evidence-based practice that reliably teaches a wide range of skills to autistic learners when implemented with fidelity. Organizations including AFIRM, ASHA, and the National Clearinghouse on Autism Evidence and Practice (NCAEP) all recognize it as meeting evidence-based criteria. It works best for learners who can sustain brief visual attention and imitate simple actions. If your child watches a short video clip and can copy at least one or two modeled actions, they are likely ready to start.
Your first step: spend five minutes observing whether your child watches a one-minute video clip without wandering, then check whether they can imitate one simple action you model live. That quick screen tells you more than any checklist.
Key Takeaways
Video modeling is an evidence-based practice that teaches autistic learners new skills reliably when paired with prompting, reinforcement, and a deliberate fading plan from the first session.
Point | Details |
|---|---|
Screen before you start | Check for 30–60 seconds of visual attention and basic imitation before choosing a video type. |
Match the type to the learner | Use video prompting for complex tasks or short attention spans; basic or self-modeling for learners with stronger imitation. |
Pair with prompts and reinforcement | Video alone rarely produces durable skills; prompt immediately after viewing and reinforce every correct step. |
Collect one data point per session | Track percentage of steps completed independently and prompt level used to know when mastery is reached. |
Fade systematically | Use scene fading, delayed starts, and reduced viewings once the learner hits 80% independent across three sessions in two settings. |
Autism Victory App | Provides guided workflows, printable templates, and caregiver community support to help you implement video modeling at home or in school. |
Table of Contents
What is video modeling for autism, and how does it work?
Does the research support video modeling for autistic learners?
What are the four types of video modeling?
Is video modeling right for your child?
How do you implement video modeling step by step?
What equipment and filming tips actually help?
How do you combine video modeling with other evidence-based practices?
How do you measure progress and know when to fade the video?
What are the most common video modeling problems and how do you fix them?
Sample scripts and an implementation checklist you can use today
Sources
What is video modeling for autism, and how does it work?
Video modeling is an autism behavior intervention that uses recorded video clips to show a learner exactly how to perform a target skill. The learner watches the video, then practices the skill in real life with prompting and reinforcement until they can do it independently. It draws on observational learning, the same mechanism that lets children pick up language and social behavior by watching others.
The basic workflow is straightforward:
Model: A person (adult, peer, or the learner themselves) performs the target skill on camera, correctly and without errors.
Watch: The learner views the clip, usually one to three times, in a calm, distraction-free setting.
Prompt: A caregiver or therapist uses a prompt hierarchy to guide the learner through the skill immediately after viewing.
Reinforce: Correct performance is followed by a meaningful reward to strengthen the behavior.
Fade: As the learner gains independence, the video and prompts are gradually reduced.
Think of the video as a visual script. It removes the ambiguity of verbal instruction and lets the learner see the exact sequence, pace, and context of the skill before attempting it themselves.
Does the research support video modeling for autistic learners?
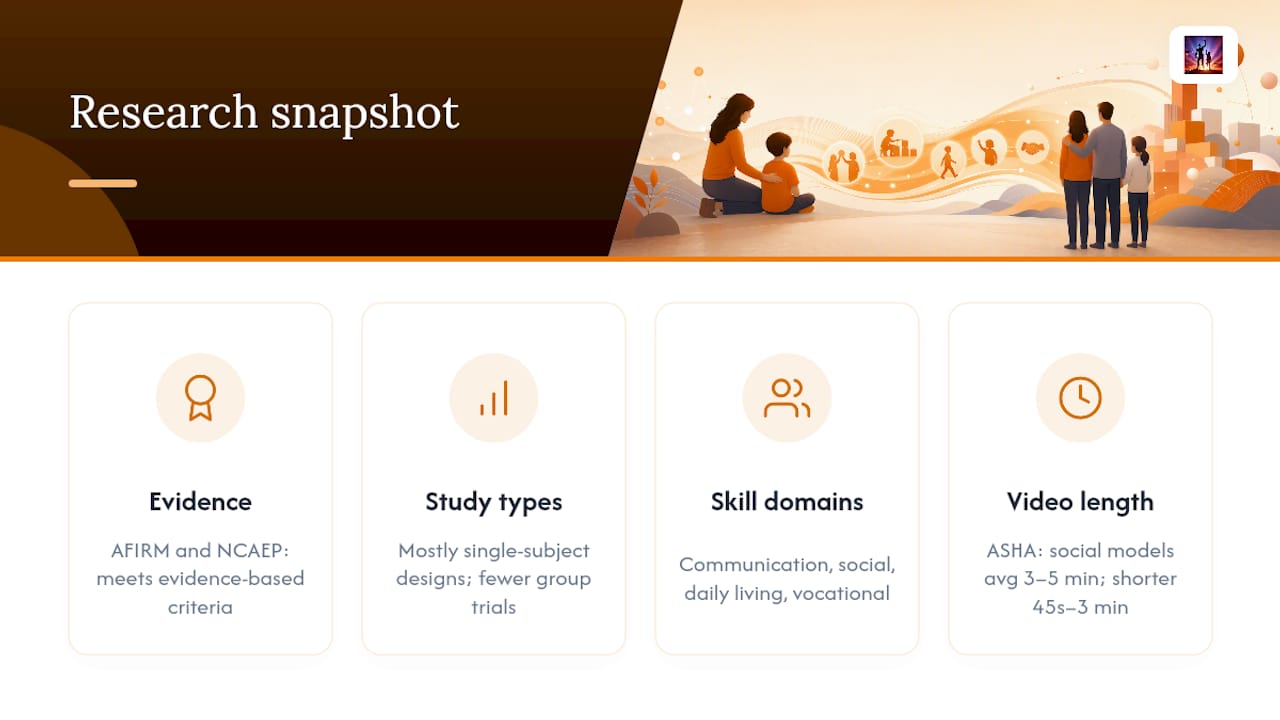
The evidence base is strong. AFIRM and NCAEP syntheses confirm that video modeling meets evidence-based practice criteria, supported by numerous single-case design studies and a growing number of group-design studies across age groups and skill domains. A meta-analysis of video modeling and video self-modeling for children and adolescents with autism spectrum disorders found skill acquisition, maintenance, and generalization effects across social and functional domains.
The skills it can teach are broad. Research documents effectiveness for communication, social initiations, daily living tasks, academic skills, vocational skills, and reducing problem behaviors. Social communication, perspective-taking, and functional routines like handwashing or meal preparation appear frequently in the literature.
Evidence note: Most published studies use single-subject designs, which are the standard methodology in applied behavior analysis and are accepted by NCAEP as sufficient for evidence-based classification. Fewer randomized group trials exist, so effect sizes across large heterogeneous populations are less precisely known. Generalization across settings and people sometimes requires deliberate programming rather than happening automatically.
For adolescents and adults, ASHA-aligned guidance recommends individualized model selection and notes that social communication-focused video models average 3–5 minutes, though shorter clips of 45 seconds to 3 minutes are often preferred based on individual attention and preference.
The practical limits are worth naming honestly. Prompt dependence is a real risk if fading is not planned from the start. Learners who struggle with visual attention or imitation may need prerequisite work before video modeling is effective. And creating quality videos takes time, particularly when editing out errors.
What are the four types of video modeling?
Four primary types exist, each suited to different learner profiles and goals.
Type | What it is | Best-fit learner | Typical clip length | Example use |
|---|---|---|---|---|
An adult or peer models the complete skill | Learner who attends to others and can imitate | 1–3 minutes | Peer demonstrates how to greet a classmate | |
Video self-modeling | The learner watches edited footage of themselves performing the skill correctly | Learner with some existing skill who needs fluency or confidence | 1–3 minutes | Child watches themselves successfully completing a morning routine |
Point-of-view (POV) | Camera is positioned at the learner’s eye level, showing the task as they would see it | Learner who benefits from a first-person perspective, especially for object-manipulation tasks | 30 seconds–2 minutes | Camera shows hands washing dishes from the learner’s viewpoint |
Video prompting | The task is broken into steps; the learner watches one step, performs it, then watches the next | Learner who struggles to sustain attention for full clips or needs tasks broken into smaller parts | 15–45 seconds per step | Each step of making a sandwich is shown and practiced one at a time |
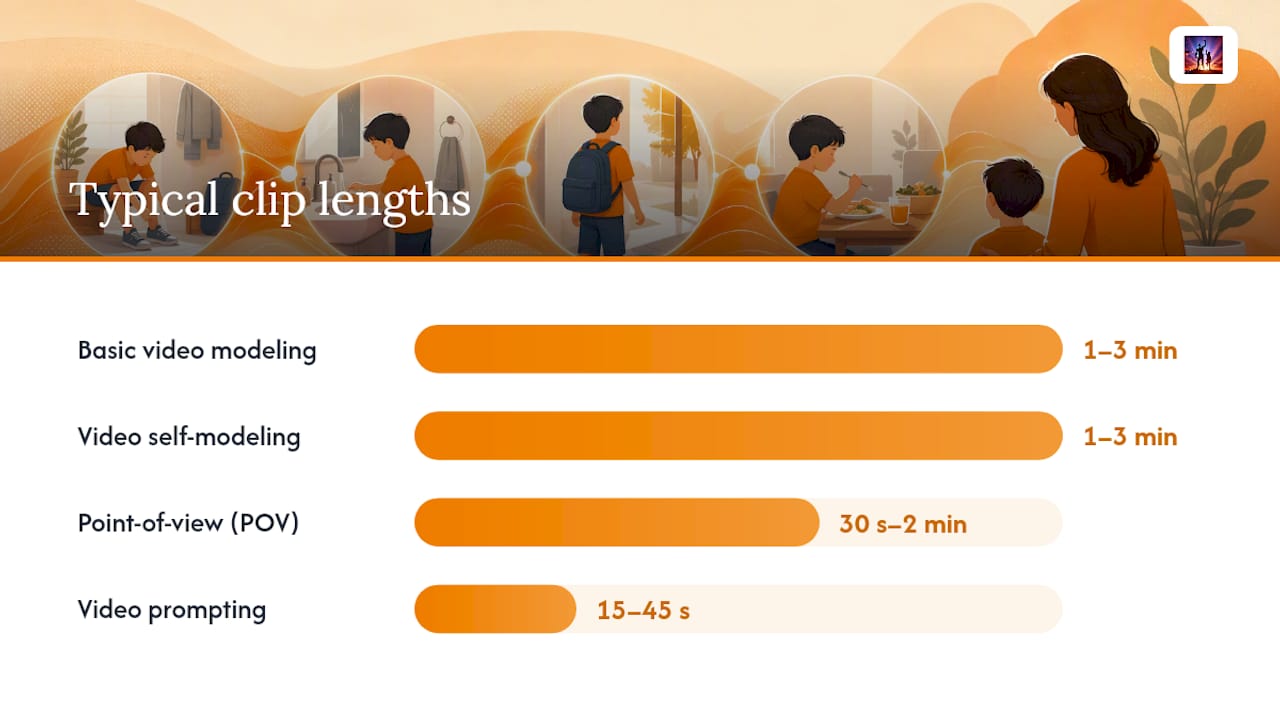
When choosing between full-model approaches and video prompting, the deciding factor is usually attention and task complexity. Video prompting is often the better fit for learners who cannot sustain attention through a complete clip or for multi-step tasks where watching the whole sequence at once creates confusion.
A few additional considerations:
Self-modeling requires existing footage of the learner performing the skill, so it takes more preparation but can be highly motivating.
POV modeling is particularly effective for daily living and vocational tasks where spatial orientation matters.
Basic modeling with a familiar peer rather than an adult tends to produce stronger social skill outcomes for school-age learners.
Is video modeling right for your child?
Not every learner is ready to benefit from video modeling on day one, and that is not a failure. It is a starting point.
The characteristics that most reliably predict success are: the ability to attend to a screen for at least 30–60 seconds, some capacity for imitation (even partial), functional hearing and vision, and the ability to follow a simple one-step instruction. A learner does not need to be verbal or have strong imitation skills to start, but some baseline in each area helps.
You can do a quick screen at home in about five minutes. Show your child a short, engaging one-minute video clip (something familiar and preferred). Watch whether they orient to the screen and sustain attention for most of the clip. Then model a simple action, like clapping or picking up an object, and see whether they attempt to copy it. If both are present, even partially, video modeling is worth trying.
If attention is the barrier, video prompting with very short clips (15–30 seconds) is a reasonable starting point. If imitation is the gap, pairing video viewing with direct prompting and reinforcement can help build that skill alongside the target behavior.
Common accommodations that make video modeling accessible to a wider range of learners include using shorter clips, adding captions or visual supports on screen, choosing a highly preferred model (a sibling, a favorite character), and pairing the video with a concrete object or visual schedule. Sensory sensitivities matter too. A learner who is distracted by background noise in a video will need a quieter recording environment, not a longer viewing session.
How do you implement video modeling step by step?
The recommended workflow follows five stages: planning, recording, implementing, evaluating, and fading. This staged approach is the framework most implementation guides align with, and it keeps the process manageable whether you are a parent working at home or a therapist in a clinic.
Plan. Choose one specific, observable target behavior. Write a brief task analysis (a list of the steps in order). Identify what reinforcement the learner finds motivating. Decide which video type fits the learner’s profile. Confirm the setting where the skill will be practiced.
Record. Prepare your model (adult, peer, or the learner themselves). Film in the actual setting where the skill will be performed, or one that closely resembles it. Keep the background clear of distractions. Record the skill performed correctly, without errors or prompts visible. For video prompting, record each step separately.
Implement. Introduce the video in a calm, consistent viewing spot. Show the clip one to three times before the practice trial. Use a prompt hierarchy immediately after viewing, starting with the least intrusive prompt and moving to more support only if needed. Deliver reinforcement for correct steps.
Evaluate. Collect data on each session: the date, number of trials, percentage of steps completed independently, and prompt level used. Set a clear mastery criterion before you start (a common benchmark is 80% independent performance across three consecutive sessions in at least two different settings).
Fade. Once mastery criteria are met, begin reducing the video systematically. Common fading strategies include scene fading (removing the final step of the video first, then working backward), delayed starts (waiting longer before showing the video), and gradually reducing the number of viewings per session.
A realistic timeline for a single daily-living skill, such as hand-washing or putting on shoes, is 2–4 weeks of daily practice sessions (two to three viewings and two to three practice trials per session) before reaching mastery criteria. More complex social skills may take 6–8 weeks. The key is consistency: daily or near-daily sessions outperform sporadic practice.
Pairing the video with prompting and reinforcement from the first session is not optional. The video alone rarely produces durable, generalized skills without those supports in place.
What equipment and filming tips actually help?
You do not need a production studio. Clear audio, consistent framing, and a distraction-free background matter far more than camera quality. A smartphone or tablet is sufficient for most home and classroom videos.
Basic equipment list:
Smartphone or tablet (any current model works)
Inexpensive flexible tripod (available for under $20 at most US retailers)
A quiet room with good natural light or a simple ring light
Free editing apps: iMovie (iOS), CapCut (iOS/Android), or Google Photos (basic trimming)
Filming checklist:
Frame the shot so the target skill and the model’s hands or face are clearly visible.
Film in the same setting where the skill will be practiced.
Record multiple takes and keep only the cleanest, error-free version.
Keep background noise to a minimum; re-record if audio is unclear.
Add captions using your editing app if the learner benefits from text support.
For POV modeling, mount the phone at eye level or use a chest mount.
Simple editing steps:
Trim the clip to remove any setup, hesitation, or errors at the start and end.
For video prompting, split the recording into individual step clips.
Export at standard resolution; high-definition is not necessary.
Pro Tip: Set up a consistent “viewing station” before you introduce the video. Use the same device, the same volume level, and the same chair or spot every session. Predictability in the viewing routine reduces the time it takes for the learner to settle and attend, which means more of the session is productive.
A smartphone-recorded video filmed in your kitchen is often more effective than a polished clip recorded in a studio, because it matches the learner’s real environment and can be updated quickly when the routine changes.
How do you combine video modeling with other evidence-based practices?
Video modeling reaches its best effect when paired with task analysis, prompting, and reinforcement. Used in isolation, it rarely produces the same results as when it is embedded in a structured instructional plan.
Here is how each pairing works in practice:
Task analysis breaks a complex skill into discrete, observable steps. This is especially important for daily living and vocational skills. Writing out the steps before filming also ensures your video captures the correct sequence.
Prompting scaffolds performance immediately after viewing. A least-to-most prompt hierarchy works well: start with a gestural prompt (pointing to the first step), move to a model prompt (demonstrating the step), and use physical guidance only if needed. Fade prompts as the learner gains independence.
Reinforcement closes the loop. The learner needs a reason to perform the skill after watching the video. Use a preferred item, activity, or social praise delivered immediately after correct steps.
A concrete example: for a learner working on making a simple snack, you might use video prompting (one clip per step), a token board where the learner earns a token after completing each step independently, and a gestural prompt as the first level of support if they pause. After two weeks of daily sessions, you begin fading the video by removing the final step’s clip and prompting that step directly.
For natural environment teaching, embed the video viewing into the natural routine rather than treating it as a separate “therapy session.” Show the clip right before the activity occurs in its real context, not 20 minutes earlier at a desk.
How do you measure progress and know when to fade the video?
Measure three things: step mastery (percentage of steps completed independently), prompt level (which level of support was needed), and generalization (whether the skill appears in different settings with different people).
A simple data form you can copy and use:
Fill in one row per session. Prompt levels can be coded simply: G = gestural, M = model, P = physical, I = independent.
Once that criterion is met, begin fading. Do not wait for “perfect” performance across every possible context before starting to reduce the video.
Fading strategies to use in sequence: first reduce the number of viewings per session from three to one, then introduce scene fading (remove the last step of the video so the learner must perform it without a model), then move to a delayed start (wait 10–15 seconds before showing the video to see whether the learner initiates independently), and finally remove the video entirely.
Generalization checks are a separate step, not an afterthought. After the learner meets mastery criteria in the training setting, deliberately test the skill with a different person present, in a different location, and with slightly different materials. If performance drops significantly, return to the video briefly and plan for generalization from the start of the next skill target.
What are the most common video modeling problems and how do you fix them?
Common problems are solvable with small adjustments. The table below pairs each frequent issue with a direct fix.
Problem | Practical fix |
|---|---|
Learner does not attend to the video | Shorten the clip to 15–30 seconds; add a preferred character or music intro; use a preferred device |
Learner watches the video but does not attempt the skill | Increase reinforcement value; add a gestural prompt immediately after viewing; check whether the task is too complex |
Learner becomes dependent on the video and will not attempt without it | Begin scene fading immediately; introduce delayed starts; reinforce any independent initiation |
Video is too complex or has too many steps | Switch to video prompting; re-film with one step per clip |
Background noise or visual clutter in the video distracts the learner | Re-record in a quieter, simpler setting; add captions to redirect attention |
Skill does not generalize to other settings | Film a second video in the new setting; practice in multiple environments from the start |
Quick troubleshooting checklist for in-the-moment problems:
Is the learner oriented to the screen? If not, reduce clip length or increase preferred content in the intro.
Did the learner watch the full clip? If not, pause and re-show before prompting.
Is the prompt level matched to current performance? Start with the least intrusive option.
Was reinforcement delivered immediately after the correct step? Delayed reinforcement weakens the connection.
Has the video been shown more than three times in one session without progress? Stop and reassess task complexity.
Sample scripts and an implementation checklist you can use today
Adult or peer model script
Introduction (say to the learner before viewing): “We’re going to watch a video of [model’s name] [doing the skill]. Watch carefully, then you’ll try it.”
After viewing: “Great watching! Now it’s your turn. [Gestural prompt to first step.]”
After correct performance: “You did it! [Deliver reinforcement immediately.]”
If the learner pauses: “Let’s check the video again.” (Re-show the relevant clip or step, then prompt again.)
Self-modeling script
Introduction: “Look, this is a video of YOU doing [skill]. Watch how well you do it.”
After viewing: “Now let’s try it together. Ready? [Gestural prompt.]”
After correct performance: “That’s exactly right. You did it just like in the video.”
Five-stage implementation checklist
Plan
Target skill identified and written as an observable behavior
Task analysis completed (steps listed in order)
Reinforcer identified and confirmed as motivating
Video type selected (basic, self-modeling, POV, or video prompting)
Record
Setting matches practice environment
Model performs skill correctly with no visible errors or prompts
Audio is clear; background is free of distractions
Clips are trimmed and exported
Introduce
Consistent viewing station set up
Learner shown the video one to three times before the first trial
Prompt hierarchy ready and documented
Practice and monitor
Data collected each session (steps independent, prompt level, setting)
Mastery criterion set before sessions begin
Generalization probes planned for at least two settings
Fade
Fading begins as soon as mastery criterion is met
Scene fading, delayed starts, and reduced viewings used in sequence
Video removed entirely once independent performance is stable
Baseline and weekly progress log:
What the evidence says about vocational skills
For older learners working toward employment, video modeling has a documented record in autism job training programs. The same five-stage process applies, with the addition of community-based generalization probes and, often, longer video prompting sequences for multi-step workplace tasks.
What actually works, and what caregivers often overlook
The most common mistake is treating video modeling as a passive activity. Families sometimes show a video repeatedly, see no change, and conclude the approach does not work for their child. What is usually missing is the prompt-and-reinforce loop immediately after viewing. The video is the instruction; the practice trial is where learning actually happens.
Start with one skill. Pick something your child almost does already, not the hardest thing on the list. A near-miss skill reaches mastery faster, which builds your confidence and your child’s momentum. Two to four weeks of consistent daily sessions on a single target will tell you far more than six weeks of sporadic attempts across three different goals.
One practical note on privacy: if anyone other than your child appears in the video, get their consent before filming. This includes siblings, peers, and therapists. Keep videos stored securely and shared only with the people directly involved in the learner’s program.
Autism Victory App supports your video modeling work
Putting a video modeling program together from scratch takes time, especially when you are also managing therapy schedules, school meetings, and everything else that comes with caring for an autistic child. Autism Victory App gives you a structured starting point: guided workflows, printable templates, educational videos, and a caregiver community where you can ask questions and share what is working.
The app’s state-specific resource navigator also helps you find funding options if you need devices, therapy support, or additional services. If you want autism financial assistance to cover the cost of tools or professional guidance, that resource is built into the platform.
Start with a 7-day free trial at Autism Victory App and access the full library of caregiver resources, implementation guides, and community support at no cost for your first week.
Sources
The sources below represent the strongest available implementation guides, systematic reviews, and practitioner resources on video modeling for autism. Each is freely accessible and appropriate for both caregivers and clinicians.
Evidence-based tutorial for speech-language pathologists: video modeling with autistic adults
A Treatment Summary of Video Modeling for Individuals with Autism
This article is general information, not a substitute for advice from a qualified doctor. Consult a qualified healthcare professional about your own circumstances before acting on anything here.
Recommended